If you want to experiment with this program, try changing the values assigned to the variables at the top of the draw() function. You can alter the number of columns or rows, the spacing, and the maximum or minimum height or width of the ellipses.
The bottom part of the draw() function is where the real work is done. The outer for loop executes once for each column, and the inner one for each ellipse in a row within the column. The left and top variables store the position, which is calculated by multiplying the loop variable with the width of the column or row and then adding the appropriate border.
The height and width variables store the size of the ellipse's bounding box. On the first column, col=0 and so width = minwidth, which is the minimum width. On subsequent columns, the width is increased until the column on the far right, where col=numberOfCols-1 and the way the maths works out is that width = maxwidth. The height works in a similar way.
As you may have guessed, the start and stop variables control the angles of the arc. On the first column, col=0 and start=0. As col increases, the start angle increases until finally it becomes TWO_PI. The stop angle is the same but it adds on a term which mutliplies TWO_PI by (row+1)/numberOfRows, which represents the proportion of the ellipse that is covered by the arc. It starts off as quite small but eventually becomes 1, i.e. the bottom row is an ellipse rather than an arc.
You may have noticed the cast to a float, using the (float) syntax. This is necessary because the other variables are integers, and in integer arithmetic values are rounded down to whole number, which is not what we want.
Lastly, you may have noticed that the stop angle can exceed TWO_PI, i.e. be more than 360 degrees. In fact, it is not a problem if either the start or stop angle take large values; what effectively happens is that a whole number multiple of TWO_PI is subtracted from the angle to make it within the acceptable range.
Saturday 31 January 2009
Tuesday 27 January 2009
My Fragment (2).. WIP
Curves in action
Now, lets look at some more interesting examples...
size(650, 600);
}
void draw() {
//variables control the number of shapes, the sizes, spacing..
int numberOfCols = 6;
int numberOfRows = 5;
int leftborder = 25;
int topborder = 25;
int colwidth = 100;
int rowheight = 110;
float minwidth = 50;
float maxwidth = 100;
float maxheight = 100;
float minheight = 50;
//declare working variables, set background and ellipse mode
float left, top, height, width, start, stop;
background(102);
ellipseMode(CORNER);
//does the drawing...
for(int col=0; col
Now, lets look at some more interesting examples...
void setup() {size(650, 600);
}
void draw() {
//variables control the number of shapes, the sizes, spacing..
int numberOfCols = 6;
int numberOfRows = 5;
int leftborder = 25;
int topborder = 25;
int colwidth = 100;
int rowheight = 110;
float minwidth = 50;
float maxwidth = 100;
float maxheight = 100;
float minheight = 50;
//declare working variables, set background and ellipse mode
float left, top, height, width, start, stop;
background(102);
ellipseMode(CORNER);
//does the drawing...
for(int col=0; col
for(int row=0; row

left = leftborder + col*colwidth;
top = topborder + row*rowheight;
height = minwidth+row*(maxheight-minheight)/(numberOfRows-1);
width = minwidth+col*(maxwidth-minwidth)/(numberOfCols-1);
start = TWO_PI*(col/((float) numberOfCols-1));
stop = start+TWO_PI*((row+1)/((float) numberOfRows));
arc(left,top,width,height,start,stop);
}
}
}
And here's what you get:

Thursday 22 January 2009
My Fragment (1) ..WIP
There are several ways to produce curves with Processing. The simplest one is via the arc function, so this is a great place to get started! First, you will see an example. Then, we'll take a look at what arcs are, without going too much into the mathematics. After this, you will see some interesting examples of how the arc function works.
Simple example
Lets begin with a simple example:
size(200,200);
noFill();
arc(100, 100, 50, 50, 0, PI);
When you run this, you will see a semicircle.

What sort of curves does the arc function draw?
Before we get into more sophisticated examples, it is worthwhile covering a little background and explaining what sort of curves the arc function can draw. Firstly, I am going to assume that you know what a circle is, and what an angle is. A radian is a way to measure an angle, and there are 2 x PI radians in a circle. So a semicircle, like the one we drew just now, has PI radians.
An ellipse is a shape which is like an oval; there is a more precise mathematical definition, but we won't worry about that here. Think about enclosing a circle in the smallest box possible: this is called the bounding box. A circle's bounding box would be a square, with the side length equal to the diameter. For an ellipse, it would be a rectangle; so you can talk about the width and height of an ellipse.
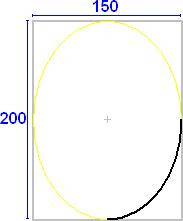
The concept of an arc, measured by an angle in radians also applies to an ellipse; as with a circle, full ellipse consists of 2pi radians. The following illustrates an arc which consists of a quarter of an ellipse; the ellipse on which it is based has a width of 150 and a height of 200. You can see the bounding box in grey.
The arc function in more detail
So, now you have the basic ideas lets look at how you use the arc function in more detail. Whenever you use the function, you will supply it with six numbers, like this:
arc(x, y, width, height, start, stop)
The purpose of these numbers is:
float x = 0;
float y = 0;
arc(x, y, 150, 200, 0, HALF_PI);
Now there are a couple of features of this program that are worthy of explanation. Firstly, ellipseMode(CORNER) means that the x and y coordinates that follow refer to the top-left of the bounding box. If we had used ellipseMode(CENTER), then they would have referred to the centre of the ellipse. CENTER is the default, so if we had missed this statement out altogether then it would have the same effect.
Secondly, we have used the HALF_PI constant to mean PI/2 or 90 degrees. Processing has three constants for angles: HALF_PI, PI and TWO_PI. Instead, we could also use the radians function to convert from degrees to radians, e.g. radians(90) instead of HALF_PI. This may be more appropriate if you are working with angles other than multiples of 90 degrees, or if you are changing the angle in a program, like we are going to do later.
Well, thats all you need to start having fun with the arc function!
Simple example
Lets begin with a simple example:
size(200,200);
noFill();
arc(100, 100, 50, 50, 0, PI);
When you run this, you will see a semicircle.

What sort of curves does the arc function draw?
Before we get into more sophisticated examples, it is worthwhile covering a little background and explaining what sort of curves the arc function can draw. Firstly, I am going to assume that you know what a circle is, and what an angle is. A radian is a way to measure an angle, and there are 2 x PI radians in a circle. So a semicircle, like the one we drew just now, has PI radians.
An ellipse is a shape which is like an oval; there is a more precise mathematical definition, but we won't worry about that here. Think about enclosing a circle in the smallest box possible: this is called the bounding box. A circle's bounding box would be a square, with the side length equal to the diameter. For an ellipse, it would be a rectangle; so you can talk about the width and height of an ellipse.
The concept of an arc, measured by an angle in radians also applies to an ellipse; as with a circle, full ellipse consists of 2pi radians. The following illustrates an arc which consists of a quarter of an ellipse; the ellipse on which it is based has a width of 150 and a height of 200. You can see the bounding box in grey.

The arc function in more detail
So, now you have the basic ideas lets look at how you use the arc function in more detail. Whenever you use the function, you will supply it with six numbers, like this:
arc(x, y, width, height, start, stop)
The purpose of these numbers is:
- x and y give the position of the ellipse; x is the horizontal coordinate, and y the vertical.
- width and height refer to the size of the ellipse.
- start and stop control which parts of the ellipse are used for the arc. They are normally expressed in radians; 0 is the "three o'clock" position and pi is at "nine o'clock". The arc is drawn beginning at the start angle and working clockwise until it finishes at the stop angle.
So, how do we use the arc function to draw the ellipse in the diagram above?
ellipseMode(CORNER);float x = 0;
float y = 0;
arc(x, y, 150, 200, 0, HALF_PI);
Now there are a couple of features of this program that are worthy of explanation. Firstly, ellipseMode(CORNER) means that the x and y coordinates that follow refer to the top-left of the bounding box. If we had used ellipseMode(CENTER), then they would have referred to the centre of the ellipse. CENTER is the default, so if we had missed this statement out altogether then it would have the same effect.
Secondly, we have used the HALF_PI constant to mean PI/2 or 90 degrees. Processing has three constants for angles: HALF_PI, PI and TWO_PI. Instead, we could also use the radians function to convert from degrees to radians, e.g. radians(90) instead of HALF_PI. This may be more appropriate if you are working with angles other than multiples of 90 degrees, or if you are changing the angle in a program, like we are going to do later.
Well, thats all you need to start having fun with the arc function!
Wednesday 21 January 2009
Outline Plan
Ok, well time is ticking on and although I have had a brief play with Processing, I have not made any progress on my fragment. I am promising myself that I am going to do just a little bit each day on it, that way it will not get in the way too much with my day-to-day stuff.
The place to start is with an outline plan! Here's what I am going to write:
• Brief preamble, reassuring the reader that the curve functions are simple.
• Present a very simple example, one line "program".
• Start off by explaining what an arc is, that there are 2pi radians in a circle. Explain what an ellipse is.
• Very simple example: draw an arc.
• Explain properly what the arguments in the arc function do. I won't make it as formal as in a programming textbook.
• Cover the constants for pi, and two different "ellipse modes".
• Give a good example, or relate the parameters of arc() to the example shown earlier.
• Explain that arc() is an alternative to the ellipse() function and can be used to draw arcs and complete ellipses and circles.
• Cover the fill, thickness effects etc (need to read up on this).
• Show a program of 30 lines which does some effect were arcs are drawn repeatedly and the angle is changed - as well as the size of the circle.
• Talk about the limitations of the arc function. Some people might naively think that an arc can do any type of curve; perhaps I ought to talk about a simple counter-example.
Subscribe to:
Posts (Atom)
