Simple example
Lets begin with a simple example:
size(200,200);
noFill();
arc(100, 100, 50, 50, 0, PI);
When you run this, you will see a semicircle.

What sort of curves does the arc function draw?
Before we get into more sophisticated examples, it is worthwhile covering a little background and explaining what sort of curves the arc function can draw. Firstly, I am going to assume that you know what a circle is, and what an angle is. A radian is a way to measure an angle, and there are 2 x PI radians in a circle. So a semicircle, like the one we drew just now, has PI radians.
An ellipse is a shape which is like an oval; there is a more precise mathematical definition, but we won't worry about that here. Think about enclosing a circle in the smallest box possible: this is called the bounding box. A circle's bounding box would be a square, with the side length equal to the diameter. For an ellipse, it would be a rectangle; so you can talk about the width and height of an ellipse.
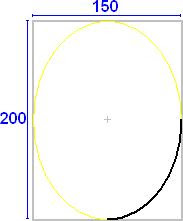
The concept of an arc, measured by an angle in radians also applies to an ellipse; as with a circle, full ellipse consists of 2pi radians. The following illustrates an arc which consists of a quarter of an ellipse; the ellipse on which it is based has a width of 150 and a height of 200. You can see the bounding box in grey.

The arc function in more detail
So, now you have the basic ideas lets look at how you use the arc function in more detail. Whenever you use the function, you will supply it with six numbers, like this:
arc(x, y, width, height, start, stop)
The purpose of these numbers is:
- x and y give the position of the ellipse; x is the horizontal coordinate, and y the vertical.
- width and height refer to the size of the ellipse.
- start and stop control which parts of the ellipse are used for the arc. They are normally expressed in radians; 0 is the "three o'clock" position and pi is at "nine o'clock". The arc is drawn beginning at the start angle and working clockwise until it finishes at the stop angle.
So, how do we use the arc function to draw the ellipse in the diagram above?
ellipseMode(CORNER);float x = 0;
float y = 0;
arc(x, y, 150, 200, 0, HALF_PI);
Now there are a couple of features of this program that are worthy of explanation. Firstly, ellipseMode(CORNER) means that the x and y coordinates that follow refer to the top-left of the bounding box. If we had used ellipseMode(CENTER), then they would have referred to the centre of the ellipse. CENTER is the default, so if we had missed this statement out altogether then it would have the same effect.
Secondly, we have used the HALF_PI constant to mean PI/2 or 90 degrees. Processing has three constants for angles: HALF_PI, PI and TWO_PI. Instead, we could also use the radians function to convert from degrees to radians, e.g. radians(90) instead of HALF_PI. This may be more appropriate if you are working with angles other than multiples of 90 degrees, or if you are changing the angle in a program, like we are going to do later.
Well, thats all you need to start having fun with the arc function!

No comments:
Post a Comment